|
|
By Esko
Koskinen (Finnland)
| The idea |
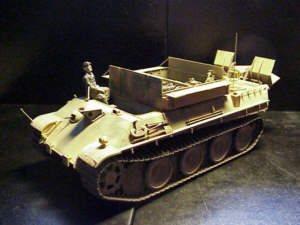
Building a Bergepanther has always been a dream of mine. When Italeri released an injection molded kit of this subject, I felt very happy. There had been some Bergepanther conversions available before, but their price has been astronomical and availability weak.
This Bergepanther of mine does not represent any documented tank, but is my personal idea what a Bergepanther of heavy SS Panzer Battalion would have looked like in spring 1945 somewhere in Plattensee area.
| The Italeri Bergepanther Kit |
 This
kit has good and bad sides. Good points are the price, very affordable.
And the fact that this is at the moment the only injection molded kit
of Bergepanther. The problem is that this kit is based on Italeri Panther
Ausf A, which is a flop, and the contents of this kit do not have very
much to do with real Bergepanther. I did not want to trash this kit, so
I decided to use at least something from it to create my model.
Most Bergepanthers were based on Panther Ausf D, but at least some were built on Ausf G chassis. One is documented by Russians in Plattensee area in spring 1945, and the other by the French in summer 1944. This Bergepanther is currently in Saumur Tank Museum in France, go and take a look. I visited Saumur a few years ago, and I had plenty of photos which to use in this project.
| Tamiyas Panther Ausf. G turns into Bergepanther Ausf. G |
 I
took a quick look into my closet, and found a Tamiya Panther Ausf G "Steel
Wheel" kit from there. This nice kit became my starting point. "Steel
Wheel" Panther was chosen because it includes normal wheels too, as well
as many other useful extras, like some IR Night sights and most important
of all, turret cupola periscopes. These found their way to my spares box,
alongside with turret that was not needed in this project.
Lower hull and track
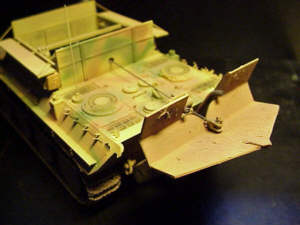
Lower hull was built as per instructions, and fitted with Tamiya separate track links. For some reason, I have a good supply of them. Cheaper than Model Kasten, and as good as them. Bergepanther has a large spade and towing hook in rear plate. These were cannibalized from Italeri kit, added some extra details and then fitted to back plate.
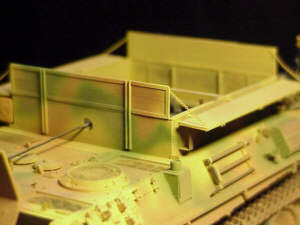
My original idea was to use Italeri winch and supersturcture box as they were, but something came up. Superstructure box was too small, badly detailed and thus unsuitable. Winch was basically good, but needed a lot of work. Luckily I was smart enough to take photos of original winch in Saumur. The drivers and radio operators compartment can also be seen in Bergepanther. Italeris idea for this part of the tank was terrible and was thrown to scrap-heap immediately. Somewhere from my collection I found Jaguar's interior set for Panther, and got the needed parts from there. This set was not very good either, and the instructions were even more worse. Some good Panther reference books proved their worth here.
Tool holders are from Tamiya, except some taken from Eduard Bergepanther PE set. Engine air intake grills are protected by steel mesh, these I found from Tamiya PE set.
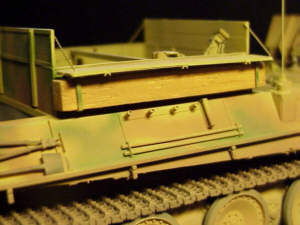
Superstructure box is entirely scratch-built, using drawings found from Motorbuch Verlag "Panther" book. Pictures from other books were handy, too. As material I used Evergreen pre-cut plastic strips. Large wooden beam in left side of the box is from balsa wood. Chains holding lowered side panels are photo-etched. This is not the same thing as real chain, but I simply could not find chain so small and realistic from Finland.
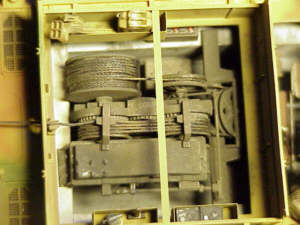 Winch
is based on Italeri winch, my photos of original and drawing from MK Editions
"Tanks WW2 vol 1" book. The winch needed one wheel more, lots of wing
nuts (from Model Kasten), even more Evergreen strips, some centimeters
of new wire to represent the steel cable of real tank, and once again,
long "fuse" and lots of time. But it turned out very good, or at least
I think so. See the photos and comment!
Winch
is based on Italeri winch, my photos of original and drawing from MK Editions
"Tanks WW2 vol 1" book. The winch needed one wheel more, lots of wing
nuts (from Model Kasten), even more Evergreen strips, some centimeters
of new wire to represent the steel cable of real tank, and once again,
long "fuse" and lots of time. But it turned out very good, or at least
I think so. See the photos and comment!In the rear of the engine deck is a cable guide with four large rollers. This was scratch-built, too, using Italeri's part as reference. Material is Evergreen plastic strips and tubes, with ancient but bery good Verlinden nuts and bolts.
Front mudguards have width-clearance poles. Were these ever used in Bergepanther Ausf G's is a mystery, but they do add some touch to the model. These poles are lathe turned brass from Jordi Rubio. And to ensure safe operating in night-time, copper wire was used to represent power cable to blackout driving light.
| The figure |
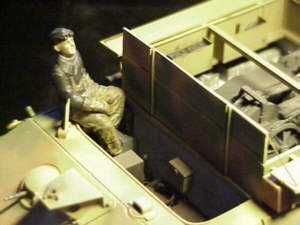
This warmly
dressed SS Panzerschütze is from Tamiya's Panther Ausf G "Late Version"
kit. My friend had extra set of figures, and he traded them to me. Our
soldier is once again wathing the skies for any Soviet fighter-bombers.
He is wearing SS Panzer tunic and warm, padded and reversible mittens
and trousers in SS Erbsenmuster pattern. He was painted using Testors
enamels and fine brushes.
| Painting |
Basic German three-colur scheme using Tamiya acrylics and Tamiya HG Airbrush. Interior of the tank is white, and the winch is Panzergrau.
Final touch was made with dry-brushing and airbrush. As an experiment I skipped pastel chalks and used more airbrush instead. Feedback once again welcome!
| Final comment |
This project needed lots of work and research. Good reference books and photos were essential. Italeri Bergepanther kit is OK for a beginning modeller, but I did not like it. Quality of Italeri kits has gone too low, unfortunately.
These kits and accessory sets were used in this project:
Tamiya Panther
Ausf. G "Steel Wheel"
Tamiya
Panther single tracks
Tamiya PE Set
Italeri Bergepanther
Jaguar Panther Interior
Eduard Bergepanther PE Satz
Jordi Rubio width-clearance poles
Loads of Evergreen plastic profiles, tubes and Sheet
And for the builder:
Tons of chewing gum (xylitol, of course)
and a few cubic meters of coke
© 7/2001
Esko Koskinen
