|
|
|
Deutsch verfügbar |
 |
 |
| The original |
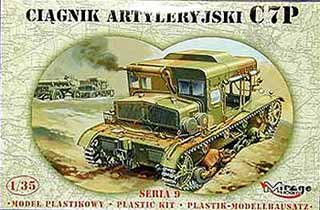
The artillery tractor C7P was produced from 1935 on by the polish manufacturer Panstwowe Zaklady Inzynieryjne. The tank 7TP was used as base chassis. The first tractors were 1935 assigned to 1st Heaviest Artillery Regiment, which got the 220 mortars. Furthermore these tractors were used as recovery vehicles in light tank compynies and used by railway engineers.
This 4.6m long tractor had a Diesel engine with 115 hp what gives it a towing capabilty of 5 tons. Maximum speed was 25 kph.
How many of these tractors were produced and in service is unknown, The Germany captured about 15-20 of these and used them for several purposes.
| The kit |
What a droll piece of military vehicle - I thought when I first saw this kit, which was given to me for review from TOM-Modellbau. With this kit Mirage chose a unique vehicle for the 1/35 range of military kits. At a price of about 20 Euro this kit really makes fun. A look into the box brings lots of parts, where all of them look good with fine details, nice interior and also the quality of the injection mold is good even when sometimes the points where the parts are fixed to the runner are a bit thick and disadvantageous. The one real point of criticism is the track, which is soft in detail and made of even more soft rubber and the point of joining the two ends is very small and needs glueing.
The instruction is extensive and has 30 steps to finish the kit. Here some of the steps are confusing and the drawings don't show exactely which part belongs where. All in all the instruction makes a usable impression.
The decals are for 7 polish variants, while Mirage is making extra kits for the German and Russian versions of this tractor.
| construction |
 As ususal all begins with construction of the chassis and running gear. The hull is constructed of bottom and two sides. The sides, which originate from the 7TP kit, need to be cut down. This was a "nice" beginning since the drawing was confusing and not easy to see where to cut what! My Tip: move track mudguards 8 and 9 into place of the side walls and cut the side wall right above the track mudguards. The bottom and side walls fit relatively good together, where you should glue together both side walls and not only one and later the other like it is said in the instruction. The running gear is made of four bogies with four wheels each, which fit with a bit o
 f cursing. You can even get the wheels rotating if you get it to glue both halves of the bogie together without wheels and bolts falling out of their fixation holes
The drive sprockets can be shortened as shown in drawing VIII but shouldn't be glued in which is better for the track installation later. The track mudguards can be glued next and fit really good! The exterior parts of the engine compartment also fit relatively goot to the hull, even here and there is a bit sanding needed for to fit the width! Part C19 need to be placed very well cause the rest of the superstructure will align at that!
The interior floor with transmission is very nice detailed and fits good into the hull. Further parts for detailing transmission and drive shaft are shown in instruction a bit confusing which leads to some trouble in fitting and placing parts. But this is no real problem at all. Even in this stage the  interior looks very good!
The interior is furthermore filled with six seats which can be build in seating position or folded up. The drawings XVI and XVII show the interior from above with parts and locations, but the clearness of this drawing is very doubtful.
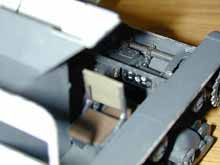 I painted the interior in dark metallic color on plated with stuctures ... vertical and even plates were painted in Panzergrey. Transmission and parts were painted in dark iron color and detailed with a dark washing. The dashboard is nice detailed by the decals from the decalsheet, even as the quality of the decals is not the best and they have some ugly big margins.
The interior engine compartment walls with air intake are made from 4 big pieces and should be carefully glued and aligned. While that it should always be dry-fitted with the superstructure top plate.
The rifles that should be fittet in the interior were left by me, while the first aid kit looks good.
 The next step makes the completion of the superstructure. First I covered the windows of part C59, which is made of clear plastic, with Color Stop and afterwards I painted around it with Panzergrau. Generally it is worth to cover all window parts with Color Stop until you are finished with painting.
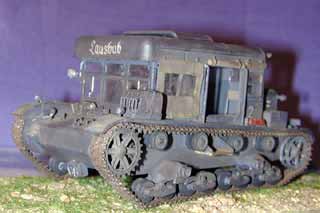
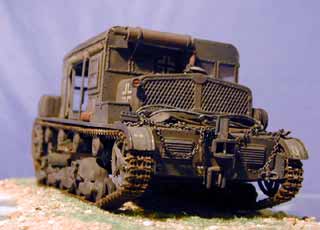
Like it is said in the instruction it is useful to complete the superstructure and the glue it to the hull. This should happen very quick to correct the fitting as needed, but all in all the fitting is amazing good. The exact placing of the glacisplate is one of the questions that are left unanswered. The option to leave the plate with open hatches is a nice feature to have a good view on the transmission.  On the glacisplate are some grips and lights to attach where I replaced part C8 by a Notek light, cause my C7P should get a captured vehicle by the Germans. Same for part 51 which I replaced by a german backlight. The muffler with its holdings should be fixed after installation of the backwards windows as one holding is glued to one of the crossbeams of the window
 .
.
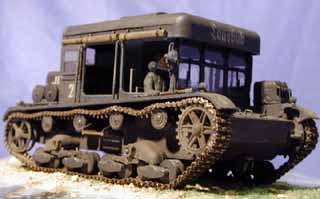
Some more detailing parts are fitted to enginedeck and superstructure e.g. the rolled up canvas for the side entrances. One of these I wanted to be rolled down. So I cut a equivalent dimensionated piece of lead foil and cut into it a rectangular hole for the window by eye, which I covered and glued from the inside with cellophane foil. The lead foil was then painted with a mixture of different khaki-colors and glued to its place at the superstructure with cyanoacrylate.
 With step XXVIII a bunchg of small parts are brought into position, including poles C29 and C30. The instruction only says part C30 for front and back postion, but for the front position C29 is correct!!
The holdings and limiting rollers of the winch are looking good, but are a bit small to glue them easy. The tools on the back are replaced by german tools. Additionally I filled the space on the C7P with some ectra material the Germans used like two jerry cans, a S-hook, a jack which I located on the glacisplate, an eye-chain, etc.
The last step is the track where I need to remark positively that the idler wheel fastening is made movable so you can adjust the track tension. The track from the kit is below standards while it is soft in detail as soft in its structure and the joining of the ends is very hard to make! Therefor I used the Friulmodel Track ATL-45 (7TP, T-26) which will fit to the drive sprocket with using a bit force!
| painting/weathering |
 Because my C7P should get a German captured vehicle, used by Panzergruppe Guderian while the French Campaign 1940, I painted it overall Panzergrau (Revell number 78). The markings are made from leftover decals from other kits such as Balkenkreuze, the numbers '2" for the superstructure sides, the 'G' for Panzergruppe Guderian, the marking of second Panzerdivision in French Campaign and the nickname "Lausbub".
This is followed by usual wash with black/brown acrylic paints ithinned with spirit as well as drybrushing with lightened grey with some metallic iron color added. Some rust stains were made here and there on the vehicle, which I  made of Revell colors 84, 83, 9 and 91 and dust of brown pastel chalk. At last the whole vehicle and especially the area of the running gear are covered with dust from lightbrown/yellowish pastel chalks.
The Tracks were sprayed first with Model Master Metalizer Steel Blue which was washed in a rustybrown and additional brown pastel chalk dust. Finally it got a worn off appearance by sanding the contact points a bit to get the original metallic color shining through!
| Fazit |
A wonderful kit, which satisfies with a good price for the shown quality and parts fitting, even when the track brings some minus points, but you can use tracks of other manufacturers like Friulmodel. Mirage got it to choose a unique vehicle for the 1/35 market and make a good kit of it! Too bad that there aren't some figures in that kit.
If ypu're fed up with the usual Tigers and Panthers of other manufacturers or looking for a nice vehicle for a field repair/recovery diorama is definitively to buy this kit!
| Price / value: | ***** | Parts fitting: | ***** |
| Details: | ***** | Skill level: | ***** |
 |
 |
 |
 |
 |
 |
© 01/2002 Thomas Hartwig
