|
|
|
Deutsch verfügbar |
|
 |
| The Original |
In 1941 it was clear that a Flakpanzer would be needed which would have at least minimum armor protection as well as cross country abilities. At this point the smallest and oldest chassis of the German Army was chosen. The exact development and conversion is unclear as Spielberger declares that the Army Ordnance Office ordered Alkett and Daimler-Benz to convert the vehicles, Stefan König from "The military machine" says that it was reported that the manufacturer Stoewer in Stettin did the conversion ... all in all it seems that the 24 converted units were field conversions, what would explain some differences of vehicles.
These 24 Flakpanzer were given to Fla.Bataillon 614(mot.) which was raised in May 1941 in Altwarp.
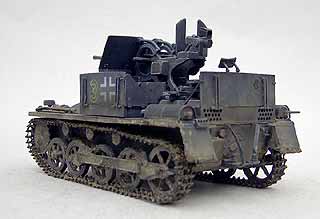
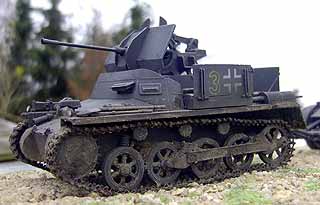
With the conversion the engine deck and parts of the superstructure were removed, the Flak38 was set a bit offset to the right. The Flak itself wasn't fixed so it could be easily removed. For this the Sd.Ah.51 was always towed with the Flakpanzer with a modified tow hook.
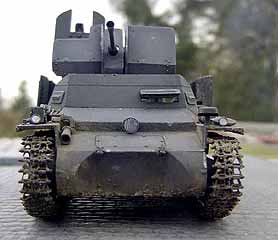
The front superstructure was moved 18cm forward what led to a noticable step on the front plate.
| The kit |
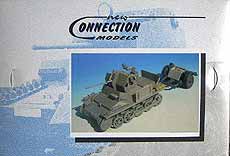
The Flakpanzer I was the most interesting conversion on the Panzer I A chassis, but in the past there was no good possibility to get a correct conversion when looking at the ADV/Azimut conversion which has some bad flaws and the horrible Panzer I A from HiPM. Now there is the excelent Panzer I A from Tristar and the New Connection conversion.
So what is the conversion about, which costs 42 Euro what is again the same amount as for the base vehicle. What we find inside is a bunch of excellent Resin parts with nice detailing. There is a nice interior with drivers place, armatures, transmission, engine wall, cardan shaft, floorplate, new engine deck, the whole Flak, metal gun barrel, new front superstructure with the "step", side and rear plates, new tow shackle, the new gunmount and the Sd.Ah.51 as injection molded plastic from Tamiya. All in all very nice parts.
The cleanup points of the resinparts are well chosen ... some need major work, as the floorplate where a big saw is well suited.
The instruction is quite good but mine needed some update as there were parts as the transmission which were not shown in the instruction. Also there are single parts shown for assembly which are already in one piece. For all who fear the assembly of the whole Flak as Resin variant can also use the Tamiya 2cm FlaK or mix Resin and Tamiya parts as they fit good together.
It's a pity that this conversion (as all conversion) lack the suited unit symbols that are needed so you have to help yourself somehow!
| The construction |
 Beginning with the base kit the running gear is done easily and looks real good. Inside the hull the supports for the suspension should be removed as the bottom plate wouldn't fit in with them remaining. This step is not clearly shown in the instruction. The bottom plate fits good with the engine wall into the interior hull, the driving levers should be shortened or moved a bit backwards as the front superstructure would collide with them. The transmission and steering gear should be placed in the front (although they might not be mentioned in early
  versions of the instruction). The dashboard can be painted and glued to its place as it is later hard to reach that place to attach it. At this point the whole interior can be painted with a bit darkened white and the other interior things in their colors.
Then the new engine deck can be placed, which fits nearly perfect to the base kit. The gap to the engine compartment wall is closed with the enclosed part which needed a bit sanding to make it fit perfect.
The gun mount  area should be placed without glueing and corresponding to that the front superstructure put in place so that there will be no gaps! Before that the front superstructure should be cleaned and dry fitted to be sure to have a perfect fit. The transmission cooling air tube will no longer fit because of the moved superstructure, so I cut it as it is seen on some photos. Don't forget the Notek light and backlight which are distinctive features of these Flakpanzers.
Further we go to the rear ... where the new towing device will be installed where you should be very cautios not  to break the fine parts. The exhaust mufflers still fit good in their place as well as the PE parts. The rear and side plates are either up or down usable, as well as the bottom plate on the gun mount for the loader. Before you glue the side plates in the "up" position, be sure that the small bolts show to the rear and the whole plate has the correct alignbment to put that bolt to the opening of the smaller triangular plates at the backward area of the side plates. The holding beams for the rear plate are selfmade from stretched sprue over a flame.
 Tools and tracks should be brought onto the vehicle after painting, where I should warn at this time to use turpentine or modelmaster metalizer colors on an un-primed track of this kind as they will make the little noses that hold the links together weak and the track will fall apart.
Next is the construction of the Flak itself. New Connection provides a complete 2cm FlaK in resin with turned metal barrel, which looks very good but needs more work to assemble as one made of injection molded plastic. Because of time limits I chose a mixture of  both. The Flak base was used from the Tamiya kit which guarantees a better movabilty in elevation. The resin and Tamyia parts fit nearly perfect together, unfortunately some of the parts are not clearly visible in the instruction. The turned metal barrel needs drilling of fitting hole into the original part which holded the injection molded barrel so it could be glued much better. The gunsight is unfortunately not movable. The armor plates of the Flak must be used from the
  New Connection set as these are the correct modified shields for the Flakpanzer I.
All in all the Flak is done relative quick and can be placed onto the Flakpanzer where it still can be turned (when the side plates are folded down).
Additionally there are the injection molded parts for the Tamiya Sd.Ah.51 which was always carried from the Flakpanzers where the Flak always could be carried on if needed. There was no instruction for the assembly of the Sd.Ah.51  in my box ... if you don't have it and encounter problem, just mail me, I can scan my instruction I have from the original tamiya kit.
The Sd.Ah.51 can carry the gun mount and a box where the soldiers stored personal equipment which is nicely done by New Connection!
With this the building process is done!
| painting/weathering |
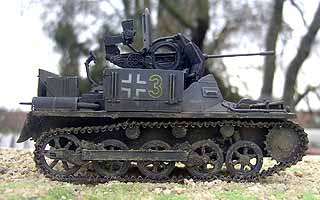
 The Flakpanzer I were only used with Flak Btl.614 and so they were used with a small amount of variantions. Photos show the possibility of simple grey or whitewashed variants.
I decided to do a simple grey. So the whole vehicle was first painted with Tamiya Flat Black ans then XF-63 German Grey which was darkened a bit.
The markings are way harder to do. The emblems were designed on the computer and Carsten was able to print them on a decal-sheet with water proof color. The result is not the best but better than nothing as the yelow color is hard to see on the dark color of the Panzer ... maybe the area should have been grounded with white color.
The german crosses on the side plates were airbrushed using Eduard  Expressmasks, as well as the yellow numbers which make this vehicle belong to the 3rd company (red would have been 2nd and white 1st company).
The FlaK was detailed with black and modelmaster metalizer steelblue. The vehicle received few minor damages where color is worn off what was done with scaping off the grey color with a knife and recoloring that area with rust or metal color.
The whole vehicle was then washed with dark oilcolors mixed with turpentine and drybrushed with very bright grey oilcolors.
The track was primed with Tamiya Flat Black then a bit modelmaster metalizer steelblue, followed by a wash with dark pastel chalk dust mixed in spirit and some additional brownish pastel chalk dust put on the wet track. A final wash with black oilcolor and turpentine made the track to disassemble as the turpentine seems to weaken the plastic. I glued the pieces of the track together and put it on. The whole running gear was then finished with fine sand mixed with paste to show the muddy conditions that were found in russia. Finally the whole vehicle received a coat of light pastel chalk dust.
| Conclusion |
The Panzer I A from Tristar is real fun to build as I mentioned in its own review and so this conversion is nce also! After cleaning up the resin parts they come together relative simple and fast without major promblems. Only the Flak is a bit more complicated and beginners may not be enthusiastic on this.
This converison features all what is needed for a correct Flakpanzer what can be seen on photos and so it is the best you can get to have this cute little AA unit. In my opinion a 'must have' for the collection of Wehrmacht vehicles, even it is not the cheapest!
Base kit:
| Price / value: | ***** | Parts fit: | ***** |
| Detail: | ***** | Skill level: | ***** |
Flakpanzer coversion:
| Price / value: | ***** | Parts fit: | ***** |
| Detail: | ***** | Skill level: | ***** |
 |
 |
 |
 |
 |
 |
 |
||
Literature:
The military machine Vol.1, Stefan König, 1997
© 11/2002 Thomas Hartwig
Thanks to New Connection for the sample

