|
|
|
Deutsch verfügbar |
 |
| The original |
At the beginning of 1940 the russians produced a real monster with the KV-1 chassis as base, with a giant turret which holds the 152mm M-10 howitzer. Until October 1942 there were 334 of these, 52t weighting, tanks produced. Because of the heavy turret armor it was not easy to knock out this coloss, on the other hand it was hard for the crew to rotate that heavy turret, with inclined chassis it was nearly impossible. The combat value of this tank is doubtful. The diesel engine V-2k gave 600 hp to achieve a maximum speed of 34km/h. There was a crew of 6men, which had 3 DT machineguns besides the main gun. Some of the KV-tanks received the "light type" track which had guide teeth only on every second link.

The Germans captured some of the KV-2 and modified the with german accessories (commanders cupola, lighting, etc) and used them in special companies, like the Pz.Abt.66 for the invasion of Malta.
| The kit |
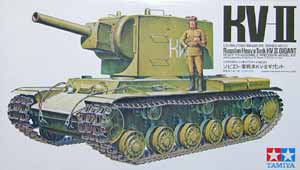
The kit from Tamiya is one of the older kits and so you don't have to wonder that the parts are a bit crude, like the tracks that were made for use as a toy, fenders that are so thick that they would be in original about 5cm thick. On the other hand there are some decent details like the wonderful structure of the steel of the turret. The instruction is good as always from Tamiya and the upper hull stays removable by a click-fastening. The decals are ok and have some russian slogans for the turret.
There are not many parts and so the kit can be ready at one evening if built straight from the box.
To improve the kit I used Friulmodel tracks "Light type" for KV1/2 as well as the Eduard PE sets 35416 (KV1/KV2 Fenders) and 35419 (KV-2). First one replaces the too thick fenders with fine new ones with correct fastenings, the second one brings some additional detail like grilles, tool-holders, and hatch details.
| The construction |
As mentioned before the building process of the base model is very simple and done in short time becuase of the few parts. The lower hull has the swing-arms molded on and can be completed easy with the roadwheels as well as idler-wheel and drive sprocket (from Friulmodel). The wheels stay turnable because of the use of polycaps.If you want to use the spare  fuel barrels on the fenders, don't forget to drill the holes from the underside of the fenders ... but as I neither want to use them nor use the kits fenders I didn't do so! The rest of the upper hull is done very quick since there are only a few parts to add like bow-MG, hatches and exhaust. The further details and conversions will be described later in the text.
The turret is made of two side-halves, the turret roof, a rear plate and the cannon itself. The barrel looks ok, but I replaced it with a turned metal barrel from New-Connection, which is very good, but needs some extra drilling in the Tamiya gun-holder.
The fitting of the turret parts was ok, where at the cannon elevation holders there were some minor problems. The turret hatch should be installed before finishing the turret since there is no way to reach the interior after the turret is closed.
After fixation of the climbing-bows at the turret sides the turret is also ready and can be located on the chassis, as well as the vinyltracks can be fixed after painting the tank ... with that it would be redy.
 BUT I wanted to build a KV-2 as captured tank and use the PE-sets.
First of all the plastic fenders should be removed ... a hard work to get the surfaces even but really worth!!! The new fenders should be fixed to the hull at last since it is too easy to break the off again when working on other parts of the tank.
So the other PE-parts were first assembled and fixed to the tank ... the air exhaust at the hull rear was made of new PE-parts and grille, which looks very good but can be hardly seen later. The two air intakes on the engine deck got to have some plasticstripes removed to attach the wonderful grilles. Hinges and handles for the toolboxes look very good and the hatches can get some extra PE if you want to have them open. The turret get only few but useful PE-parts as 3 periscopes which get into the (normally empty) shafts, as well as riveted ring for the turret hatch.
The new fenders have the correct fender-holders and riveted stripes. The construction as well as the bending and glueing needs some advanced experience as well as very even sanded surface at the hull sides, since the contact areas of PE and hull are only the small sides of a PE part of only a few tenth of a millimeter, so it can happen that these break off again when working too rude on these later. This gets a bit better when glueing the holders between fender and hull ... here you have to watch out for accurate bending and fitting of these holders so the fenders will stay in a 90° angle. The long stripes of rivets and struttings are also hard to bend and to put correct in place with the short time a cyanoacrylate-glue fastens. All in all it looks very good if you got it all fitted in place.
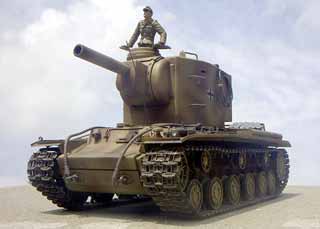
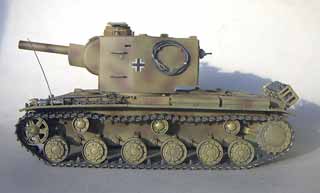
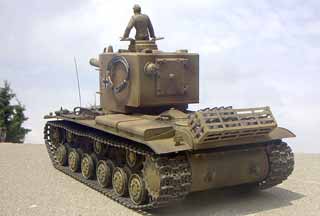
Next is to make the KV-2 to a captured tank from the Germans as they were converted and used 1942 in the 2nd company of Pz.Abt. (z.b.V.)66. I had only 2 or 3 original photos to look for the conversions. Main focus was the commanders cupola, the  ammo storage at the rear engine deck, the tool and spare track storage and the german lighting system.
The commanders cupola was, as it can be seen on the original photos, NOT (like on many kit conversions I have seen) on the hatch which is in the turret, but in front of that at the front right corner of the turret, which is th ereason why the top handle bar for climbing the turret was moved from the turret roof to the turret side! So I placed a Panzer III commanders cupola at its place, marked it and cut a new hole in the turret roof. I added some holders for towing cables on both sides of the turret, which I made from leftover PE-material and the tow cables were used from an old Italeri Elefant kit.
 The conversion to a german vehicle led to the use of a Notek-light on the left fender and two hull width indicator lights. These parts were used from spare parts I had. What is easy noticeable is the cable, which I made from stretched sprue, which leads from the original place of the russian headlight above the front plate of the driver to the Notek-light. The german tools were located on the fenders as good as it can be imagined from the photos but at least each modeller can use his fantasy here since it is enough room there.
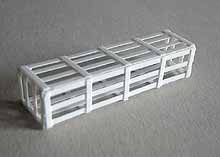 Most work was done to get the cardtridge holder which can be seen on the rear engine deck on the original photos ... it looks as the cartridges for the cannon were stored there, either to have more room in the turret or to get more ammo on the vehicle. From the photos I have, which only show that thing only partially and in poor quality, I had to imagine and construct that thing on my own which comes close to that. I made a construction plan at the computer and built the holder from 0,25mm x 1,5mm plastic profile.
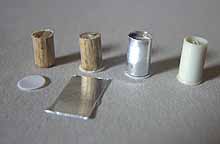 The cartridges itself can be buyed from ADV/Azimuth but I had no money left for these so I tried to make them on my own.
So I bought a wooden pole with 4mm diameter which I cut into 6.3mm long pieces. With a pair of punch pliers I made 4.5mm diameter covers from 0.25mm plastic sheet and glued them to the pieces from the wooden pole. To achive the small "corner" on the other end I glued lead foil around the wooden pole pieces ... a laborious but cheap way. Without the whole planning and preparation I made around 30 pieces within 2 hours. The picture on the left shows the left 3 pieces in different stages and the right piece is an original from ADV/Azimuth which I received as a sample (Thanks again!).
 After painting the tracks get on the vehicle, where I used the Friulmodel tracks for KV-1 and KV-2 "light type" which were used sometimes on these tanks. In comparison to the vinyltrack of the kit this is a real feast for the eyes and makes a good view together with the running gear as the tracks are wonderful hanging between the return rollers ... fortunately the drive sprockets were already part of the track set from Friulmodel!
| Painting/weathering |
 The painting was very interesting since the original photos are hard to face the real colors of these tanks ... members of the Pz.Abt.(z.b.V.)66 report that the tanks were repainted for the invasion of Malta to sandyellow with brown stripes and splotches.
So I decided to prime the whole vehicle in a green, which seems NOW to me a bit too light for a russian green ... the parts added from the germans were painted in red oxide primer.
 After that the whole vehicle is sprayed with Tamiya XF-59 yellow and highlighted a bit at big areas with a bit lighter XF-59. The brown splotches were made with Tamiya XF-64.
As markings I used only german crosses of norml size at the turret sides ... at first sight unusual for captured vehicles since these normally wore overdimesioned german crosses, but the photos show normal sized crosses and for the invasion of  Malta it was clear that the KV-2 coming up there must belong to the german army. The german crosses were made with Eduard Express Mask set ... a real good set for such! Since my KV-2 should be at the time before action I haven't done any damages and made only a light weathering. So I made a wash with dark oil colors and some drybrushing with lighter yellow colors. The tracks were primed with Revell 9 anthracite and with
  Model Master Metalizer steelblue a bit oversprayed. This was finished with a wash with brown oil colors and brown pastel chalk dust. The contact areas of the track were slightly sanded to get the original metal color of the Friulmodel tracks.
The self made cartridges were painted in a dark-metalized grey.
The whole vehicle was then a bit dusted, especially the running gear area, with a mixture of light and yellow/brown pastel chalks!
| Conclusion |
A very easy kit of a vehicle that you either hate or love because of that ugly turret ... but for sure this monster is a highlight in your collection . If you build it straight from the box you have it ready very fast and easy and have a acceptable model if you don't look too close ... an amitious modeller should at least use new tracks and fenders which make the look of the kit much more better, so the Eduard PE-set with the fenders is very useful, the base PE is nice but not needed imperative.
The most work I had was the detailing and coversion works for german captured tank and therefor the Tamiya KV-2 is a good and suitable kit!
Tamiya base kit
| Price /value: | ***** | Parts fitting: | ***** |
| Details: | ***** | Skill level: | ***** |
with Eduard PE Sets
| Price /value: | ***** | Parts fitting: | ***** |
| Details: | ***** | Skill level: | ***** |
 |
 |
 |
 |
 |
 |
 |
© 6/2002 Thomas Hartwig
