|
|
|
Deutsch verfügbar |
 |
| The kit |
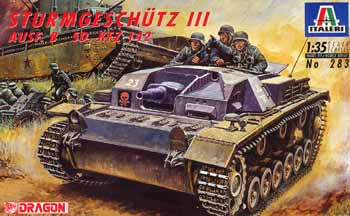
Sometimes it is really rewarding to build a kit out of the box without too much fuss. However, in my modelling philosophy, one criteria must be fulfilled; it has to be a reasonably accurate kit. I picked up Italeri´s StuG III Ausf. B kit some time ago, it is basically the Dragon kit reboxed and without the etched parts. In my opinion these kits from Italeri are really good value for money, leaving you with the possibility to invest in some additional detailing sets.
| Construction |
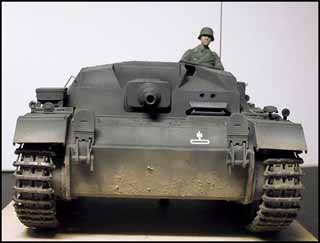
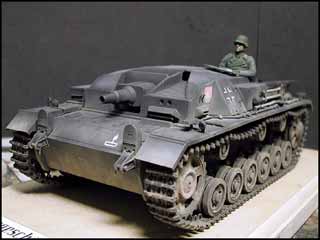
 Basic construction was done really quick, the kit falls together very easily, the only area needing some careful glueing is the fenders. They can be a bit difficult to fit to the chassis. The tool clamps, engine grill and other small etched parts were leftovers from previously used sets. The engine grills were actually Dragon leftovers. I substituted the kit tracks with Friulmodel tracks. The Ausf. B models can be seen with the early 40 cm. track and the later one with some kind of lightening hole at the track ends. I chose to go with the early track set. It gives the StuG a "vintage" look...
| Painting/weathering |
Well, soon the StuG was ready for paint. I have recently started to "prime" my models with matt black or very dark brown. Why? To prevent the light plastic in most kits showing through in unwanted places. I even give my models a dark wash too, after this primer coat has been sprayed on. The dark undercoat gives a good basis to build the colour up, working from dark to lighter shades. The dark shade remains in crevices, while I can build the colour gradually lighter towards the panels that catch most light. Control with the airbrush is an important factor. I use isopropyl alcohol to thin the Tamiya acrylic paints. I´m a big fan of Tamiya acrylics, and for spraying I never use anything else. The Tamiya paint can be thinned quite heavily with the isopropyl alcohol and still maintain an airbrush-friendly consistency. This makes it ideal for light, careful coats to vary the colours, I´ve even thrown most of the pastels out and use the airbrush for most of the dust application as well!
To obtain a satisfactory finish one usually must experiment a little. I usually spray a light coat there, and a dark shade there.... and keep doing this until I am satisfied with the appearance. Then it is time for washes. For Panzergrau I use an almost black wash. Oil paints thinned with Humbrol Thinner work well. I pre-wet the surface with the thinner, and then I let the wash run into the crevices on the model. I use a flat, soft, dry brush to remove the wash from the large flat areas, letting it remain in the shadow areas.
After the wash was dry, drybrushing was next on the schedule. Black and white oil paint was squeezed out on a cardboard sheet and left there for a day. The cardboards sucks the oil from the paint, leaving an oil paint with more opacity and better suited for drybrushing. It also prevents the oil paint to dry shiny. A light grey colour was mixed and picked up with a relatively stiff, flat brush. This was then almost completely wiped off on some tissue. Then the model was brushed over, leaving the light grey on surface detail and protruding parts. The mix was also used to give the flat panels colour variation. This is important, as the Panzergrau scheme otherwise can look dull and boring. The original Panzergrau also seem to have weathered very easily in dusty habitats. Some paint chipping was applied using a fine brush and Tamiya Flat Black mixed with a hint of Panzergrau.
 Markings were applied using Stencilit photo-etched masks, and the unit insignia came from old Verlinden dry transfer sheets. The unit insignia seem to be out of registration, and I cursed and kicked Verlinden Productions. Then I came across an original close-up photo of the insignia, and the insignia actually had the white and red painted that way! Now, Verlinden, was that intentional, or just luck? I wonder...
Finally, after the hull, all the wheels and tools and so on were painted, I misted on a dust coat mixed from Tamiya Buff, White and Desert Yellow. The mix was heavily thinned and applied carefully, using high pressure and holding the airbrush some distance away from the model. Panzergrau stripes was applied horizontally some places to simulate the dust being brushed off by branches and undergrowth.
The tracks were then pulled on and given a rub with tissue paper dipped in graphite powder, to obtain a heavy metal sheen on the surfaces subject to wear. This was also done on other parts of the vehicle where the paint wear off down to the bare metal.
| Last Words |
Then the remaining work was pretty much to attach the model to a base and add a simple crew figure made from various Hornet and Tamiya parts. As I said, it is nice not to spend too much time on construction and actually get something done instead of fiddling with some tiny etched parts for months... Well, a nice kit, cute vehicle, now on to some large cats, catch ya all soon!
| Price / value: | ***** | Parts fitting: | ***** |
| Details: | ***** | Skills: | ***** |
 |
 |
 |
 |
© 1/2002 Øyvind Leonsen

