|
|
|
Deutsch verfügbar |
 |
| The original |
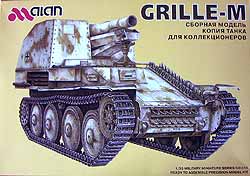
The sIG33 was tested on several chassis before ... in April 1943 it was build into 90 units of the Panzer 38(t) Ausf.H chassis with changed superstructure. All in all 282 units were built of this selfpropelled gun. The superstructure was moved to the rear and the engine to the middle.
The armor of the superstructure was only 10mm thick. A crew of 4 men had 18 shells of ammo and the whole vehicle had a weight of about 12 tons.
| The kit |
Long proposed this kit of "Grille M" from Alan as injection molded plastic kit finally came to us at the beginning of 2002. The kits parts are typical Alan-style ... the plastic is relatively clean at 7 sprues but some parts has some fish-skins, especially the track-links which will make some work to clean up. Details are good and come close to these compared to the "big" companies in the business. The single track links look good (except for the fish-skins) and are nice detailed. The hull is made of several parts which is on one hand not easy to assemble without fitting problems, on the other hand this is a good base for upcoming 38(t) models.
The exhaust muffler screen is a PE-part as well as the tool box, which is a good idea!
Additional there are ten 15cm genades for detailing the interior, but they are a bit raw in detail.
The instruction is also typical Alan ... 15 steps, where some drawings are a bit overloaded with parts. Fortunately there not that much errors in parts declaration as in previous kits, but this one lacks useful overviews of bigger-parts alignment and exact parts placement which can lead to disappointment sometimes.
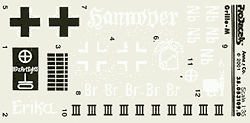
Decals show markings for the grenades and for the vehicle markings for the 1st SS Panzerdivision and two variants of the 13th Panzerdivision with german crosses. Unfortunately the marking for the 1.SS Pz.Div. is mirrored, so don't use it!
This kit costs about 25 to 30 Euro at is at this time the only one available as injection molded plastic kit of this interesting variant.
| The construction |
 Lets begin with construction of the hull, which is made from several parts, which go together very good astonishingly. Just take care at the front plate D8, cause there are no markings how and where this need to be attched exactely. So the upper hull and drive sprockets should be placed very quick to see how D8 need to be placed. The running gear is easy as ever to assemble, unfortunately it is not movable. I wanted to use the Friulmodel tracks for this kit so I replaced the kit's drive sprockets with these from Friulmodel which is no problem at all and only needs some drilling to widen the hole in the final drives. Depending on your painting skills the roadwheels can now be glued or just later after painting the rubber bands of the wheels.
 The track mudguards for the front are fitting good, but should only be placed after positioning the upper hull. The next step brings some glueing small parts like hatch doors, spare tracklink holders, hooks, etc. Also the toolbox made from PE is used here and makes an excellent impression. Alan understoop that the fine hole.structure can only be realised as PE-parts not as plastic!
If you didn't know or have no references ... the notek-light is placed on parts D53, which isn't said in the instruction.
The next steps are getting a bit more complicated ... making the interior ... part C114 needs some rearrangement ... here you need to cut off the left grenade holder in the front row (the one which is nearest to the rectangular piece in the middle) and don't place part B74/C74  there cause this would collide later with the gun which won't fit in place with that piece there! Part C114 then needs to be glued very good and exact in place what maybe need some filing and sanding cause mine won't fitt 100%. The fire extinguisher should be placed later to see if there is enough room left for it.
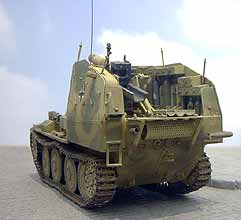
At the rear plate are some small parts to attach as well as the exhaust, which is placed into position but this makes some problems to fit the triangular pieces that hold the rear superstructure plate when folded down. The tube for the exhaust is made of two pieces which doesn't fit very good at the contact area ... some sanding is needed.
 The tools should be place after the painting of the vehicle. The gun-barrel holder on the front superstructure is an intersting thing here ... drawing in the instruction and the real parts seem to be different and it's hard to figure out the placement and alignment as the superstructure has nor markings for attachment. It's hard to descripe per text how I made it ... I can only provide my pictures how I made it ... if thats 100% correct??? Who knows?
Let's move on to the gun itself ... the parts look ok, but the drawing in the instruction makes some confusion. Parts C110 and C111 seem to be interchanged, part C106 only fits after drilling the hole wider, handwheels seem to be too big and alignment of the traversing and elevation shafts C98, 99, 100 and 101 is totally unclear, especially C111 is absolutely "not positionable". Barrel, breech and surrounding parts fit much better and look good, even when it would be much nicer when the barrel would have structure from inside. The finished barrel on its sliding mechanism must placed into the gunmount, that is clear but is never shown in the instruction ... not a problem for me, but what about the rookies who wonder how to attach.
Next the crew compartment walls are completed from the inside with cartridge boxes and more details, which leads to some other problems of collision between parts and the question for exact positioning. Part C88 at the left wall should be placed as high as possible, or even better after the positioning of the radio set.
The front superstructure wall isn't C53 but C104. The flap, C75, which protects the gun at the lower front is then glued to an certain angle at which the gun should later stay. This flap normally moves with the gun elevation, here it must be glued and so the elevation is fixed. The three superstructure walls of the crew compartment then get placed onto the hull and glued together, which interestingly went very fine, but you need to dry-fit before, cause part C114 from the interior can make some problems!  The positioning and fitting of the whole gun into the vehicle is again never shown in the instruction ... if you only do what the instruction say, your vehicle would have no gun. ;-) Fortunately it is quite clear where it should be and it fits good into place on the rectangular pin in the middle WHEN you have removed the one grenade holder on part C114 (mentioned above).
Moving on to detailing the interior with grenade holders C73/B74 from which there should be 7 pieces (shown in instruction) but there are only 6 on the sprue. Also the positioning of these is very unclear since the instruction seems to have much more room as there really is! To solve this problem just put them where there is space near the place they should be. The thin beams around the radio-set are some kind of wierd and hard to fix into right position. The last parts to put into place are the seats and the radio-set rain cover. The rod above the crew compartment for holding a canvas is too wide and so it left it off, on original photos this is also very seldom to see.
| Painting/weathering |
 At first I painted the whole vehicle with rust-primer (made from Revell "Ziegelrot" and a bit "Panzergrau"), the interior is painted in Revell 78 "Panzergrau". After that the whole vehicle is painted with Tamiya XF-60.
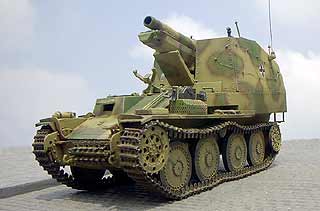
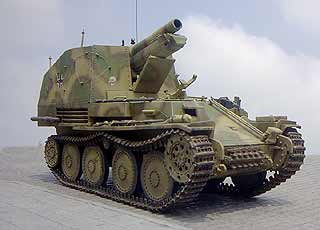
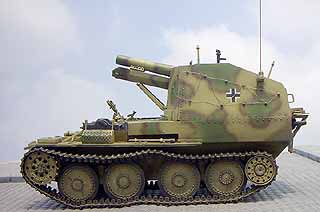
The camouflage is some kind of special pattern this time which I saw on original photos. First I sprayed some green splotches of Tamiya XF-58 which I tried to have relatively sharp edges. This was achived with the tan colored nozzle and high pressure of above 3bar. The thin brown stripes from tamiya XF-64 around these green splotches made real work! I also made these with the tan colored nozzle and reduced the  distance to about 1cm. A piece of paper was hold near the area where the stripe should begin and I tried the correct balance of color, distance and air on that paper to have the right thickness and then moved over to the kit to spray the line around the green splotches. Unfortunately teh color often stopped so I had to move over to the paper again and begin again to make the adjustment for the fine line. So it took me over 2 hours just for these lines, but I think it was worth it!
After that the german crosses were applied using the Eduard Expressmask stencils. As I want my vehicle belonging to the 3rd SS Pz.Div. I also applied the "Totenkopf" on the right front and rear superstructure using the Real Model stencil sheet RM008.
 Then the whole vehicle was washed with dark mixture of oil-colors and turpentine and after drying drybrushed with light-yellowish color to show edges and corners.
What took also some time was the wire which was often found at the superstructure sides on original photos. I made this from extreme fine wire from a magnetic spool. This is hard to paint but is extreme well suited. The wire was fixed to the small pins at the sides by using cyanoacrylate glue.
 The track was primed with black color and thin oversprayed with Modelmaster metalizer steelblue. The it was washed with a heavy mixture from black/brown pastel-chalk and spirit. The contact areas then were sanded to show the original metal color of the Friulmodeltracks and to imitated wear off. The roadwheels get some oil stains in irregular length and way, made from the oil-imitate from the Gunze weathering set.
After the tracks are fixed to the vehicle it is dusted a bit with light pastel chalks, especially the running gear.
| Conclusion |
A nice little vehicle which will look good in each collection and builds into a great model if being cautious and skilled. Now there are two Eduard PE sets for this vehicle which came too late for me but seem to be very recommended! Tracks from Friulmodel look great on this vehicle and add more realism to it.
The problems with the positioning of parts and incorrect drawings of the instruction are bad, but can be solved. The decals shouldn't be used .. there are other, better possibilities for markings. The details are very good seen on such relative cheap kit.
After all I can say that experienced modellers can build a real gem from it, where rookies may encounter problems here and there!
| Price / value: | ***** | Parts fit: | ***** |
| Details: | ***** | Skill level: | ***** |
 |
 |
 |
 |
 |
 |
Used literature:


© 8/2002 Thomas Hartwig
