|
|
|
auf Deutsch verfügbar |
 |
 |
| The original |
The Panther was the most popular tank beside the Tiger of the German Army. As the T-34 appeared on the Eastern Front and the Panzer III and IV got obsolete the planning of a new type of heavy tank was speeded up to be superior to the T-34.
In December 1941 Daimler-Benz and MAN was given the instruction for designing a new tank of the 30 ton class. In March 1942 leading politicians agrred the proposal of Daimler Benz, but a special commission decided in May 1942 to give the contract to MAN and it's proposal.
In January 1943 the production of the Panther started, beginning with designation Panther D of which 842 units were produced until September 1943. The improved Panther A folllowed with 2200 units from August 1943 to July 1944. Next came the Panther G which was again improved like partially improved armour protection, drivers visor in the glacisplate was eliminated for a rotatable periscope, different ammo storage, shock absorber changes, changes on engine deck, etc.. Within the production run further changes were implemented like the "chin"-gun mantlet, fighting compartment radiator with changes of the left enginedeck fan and an limited run of 24 tanks received steel wheels.
All in all 2953 Panther G were produced by MAN, Daimler-Benz and MNH from March 1944 to April 1945.
Driven from a 700hp Maybach HL230P30 engine the 44,9t heavy Panther could achieve a top speed of 55km/h!
| The kit |
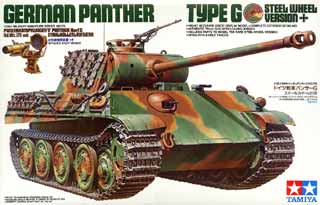
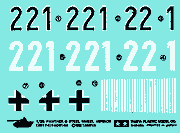
To try the new photoetched Zimmerit from Eduard (35373) for the Panther G, I chose Tamiyas Panther G Steelwheel version. That kit also contains the normal wheels which I used then. The quality of the injection molded parts of tamiyas kit is good as always. The instruction looks good and shows in fine drawings all you need to know. The track is as usual the vinyl type which is good detailed. At a price of 40€ it is at the upper margin even with that good details and quality. The decal sheet has not much, while Panther of that period had not much markings, only Balkenkreuze and turret numbers.
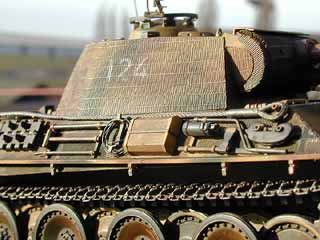
Der Eduard photoetch set at about 15€ is made for Tamiya Panther 35176 but can also be used for this one when you make the Zimmerit for the lower part of the gun mantlet on your own. The PE sheets show fine detailed vertical zimmerit and looks very good.
| The construction |
The construction begins with insertion of the suspension arms where you should make sure that they are aligned correct, because if not, some wheels may not contact the ground. With the glueing of backplate of the hull the hull itself is nearly completed and we start glueing the Eduard Zimmerit PE-sheets to the according areas. The PE parts are exceptionally big and handy and fit good to the Panther.  Areas where later other parts "look through" the PE-part, are cut out and are exact. Because you need to glue the big PE-sheets with cyanoacrylate you'll face apart from glueing things to your fingers another problem. Once attached to the area on the kit you have nearly no time to correct the alignment but that is needed especially with big PE-parts which you can't position 100% correct at first attempt! This is meant especially at locations where these PE-sheets meet at edges (e.g. turret, front hull). Here a cyanoacrylate-gel maybe used which gives the opportunity of some more seconds of moving glued parts. (by the way ... with that glued on metal parts you should avoid waving temperatures because of different expansions of different materials the metal parts crack off the plastic ... annoying especially if the tank is ready painted). I ripped off the PE-parts for the ball-mount of the MG cause they were'nt good and
  I made zimmerit myself with putty. The front mudguards were removed and made of the PE-parts of the Eduard set which needs a bit handycraft.
The upper hull can be attached and glued to the lower hull after fitting of periscopes. Marriage of upper and lower hull is no problem with the good fitting quality of Tamiya. The hull gets in the next step parts like tool holders, baggage bins und hatches. Not much work at all, the tools themselves were attached after final painting. The position of tool holder on the right side wasn't exact that of the marking on the zimmerit PE-sheet, I think that may be correct with the Panther kit thet the PE-set was made for!?
Even the engine deck is also fast assembled with only a small amount of parts. The side skirt holders had some more small parts and look good. The skirst itself seem too thick nd ao I left them off which wasn't unusual for Panther G's.
The turret is also easy to make, exept for the 7 commanders periscopes in the cupola. The gun turret interior consists of four good detailed parts. The gun mounting is tightened with a screw which is very useful in my opinion. The optional infra-red device is made of eight parts which look good, but I didn't use it for my Panther. The access hatch in the turret rear wall is movable.  With the attaching of that rear wall the turret is nearly done. The gun barrel of Tamiya is made of two halves which can put together to an excellent look if you're glueing exact and fine. I used the Eduard turned gun barrel 34001 for Panther which is made with milled muzzle brake and looks very good. Because of the gun mounting tightened with the screw the gun can still elevate and hold position even with this much heavier barrel. Now the turret can get it's zimmerit PE-parts which all fit good, exept for the side parts that were made for a "chin" gun mantlet and so don't fit here.
  The PE-set has two zimmerit plates that are not used and so I cut the missing parts for the lower part of the gun mantlet.
After that the whole vehicle and wheels were sprayed in Tamiya black.
Now the chassis can be completed with the wheels. The wheels and the vehicle are again sprayed with airbrush ... this time in Tamiya XF-59. The rubber for the wheels is made with anthrazit color from Revell. The construction of the interleaved wheel system is no problem.
 Because of the black priming deepenings already look dark through the yellow and make a plastically look but this effect fades away with every turn of spraying.
After applying of the camouflage pattern the rest of the tools can be attaced to its places, which is perfectly made by Tamiya. But the towing cables are a mystery to me ... they're so stiff and neither fit to the shown places nor they look realistic in a nearby position if you think of gravity.
The vinyltrack looks good but I chose the single track links from Dragon which don't fit 100% but about 99% and so they make a more realistic look. The disadvantage is clear ... some links go apart as the track is fixed onto the running gear (it seems the links prefer going apart at places where you see it only after the glue is dry).
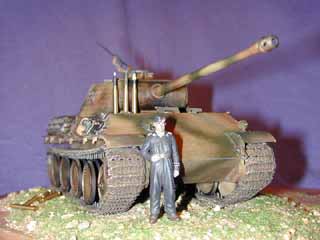
Thats for the construction. The included figure can be used for a diorama but not fpr the commanders cupola as it didn't fit in there.
| Painting /weathering |
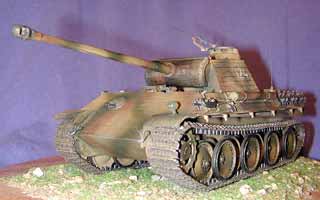
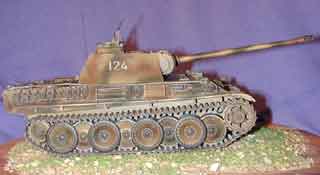
 My Panther should be attached to the 9th SS-Panzerdivision "Hohenstaufen" in the summer 1944 and sprayed in three-tone camouflage.
After the mentioned priming in black the whole vehicle was sprayed in Tamiya XF-59 sand yellow. The picture on the left you can see the effect of black priming in the deepenings, even without a wash!
Next the green camouflage stripes were sprayed with Tamiya XF-13, while the brown stripes were made of Tamiya XF-64. I used the grey nozzle of my Aztec airbrush which had good effect.
I didn't want to use decals for the markings so I used Eduard Expressmask foils for turret numbers and german crosses. The self-ashesive foils were just as tight on the zimmerit that they didn't fly away from the airbrush but also could removed without grabbing color from the tank. The result is very good in my eyes.
Finally the good looking result should get a wash and some weathering to look best ... normally no problem ... so I thought. But my patience was proven to the extreme and I had visions of the Panther kit flying to the wall, in the waste, under my feet or the scrap-press!
You ask why?? This was the first time I worked only with Tamiya colors so I had to change my experienced washing from spirit/pastellchalks to turpentine-substitute and oil-colors. A hint (which I got too late) is to put the oil color on a piece of pasteboard so it takes some of the oil in the color. I took black and burnt umbra and mixed it with lots of turpentine-substitute. This mixture was put first only in the deepenings which had quite good effect because of the cappilar-effect, unfortunately it makes here and there ugly stains where the mixture came out of the deepening. Because of that I washed the whole vehicle. The road wheels were washed extreme and made a very good effect. The tracks which I sprayed with Modelmaster "steelblue" were also washed but the effect wasn't that satisfactory
What now followed were hours and days of despair, because the whole vehicle shined like a highly polished, glossy piece of rind of bacon! The first try to fight the gloss with dusting with pastel chalks leads to the first "AHA", because the dust took the oil-moisture and led to crusts ... at the running gear ok it was unaccepable at the upper hull and turret.
Next try was to use dullcoat of Revell for the airbrush ... well exept for the fact that you only can guess where you have already sprayed (my shiny model and the fresh dullcoat shined exactely the same) the result was that the model was a bit less shiny ... I really got disappointed cause at the next day I noticed that the whole tank got very dark (I have no idea why).
Last try was to take the rest of the shining with applying light pastel chalk dust without covering the camouflage too much.
At least it looked not good but ok and saved the Panther from death by destruction.
| Conclusion |
The Tamiya kit again is best with functionality, details amd parts fitting ... if you want a good kit that is easy to assemble you need to have the Tamiya Panthers. The deficits are only the relative high price and the vinyltracks, which of course are suited for beginners but for building a really exact model they're not good enough!
The Eduard Zimmerit PE is good as it fits good and saves a lot of work and is much cheaper than Cavalier Zimmerit. The disadvantage is that damged zimmerit is hard to make with PE-material. Also the positioning of big PE parts and cyanoacrylate is somewhat difficult and can lead to ugly gaps. Maybe this is only a question of trials ... all in all a hot candidate on the zimmerit-market.
Tamiya base kit:
| Price / value: | ***** | Parts fitting: | ***** |
| Details: | ***** | Skill level: | ***** |
Eduard PE-Zimmerit:
| Price / value: | ***** | Parts fitting: | ***** |
| Details: | ***** | Skill level: | ***** |
 |
 |
 |
 |
 |
 |
 |
Recommended literature:



© 02/2002 Thomas Hartwig
