|
|
|
Deutsch verfügbar |
 |
| The original |
The heaviest possible armor was the main aim of this project which was given to MAN and Daimler-Benz. At the front of turret and chassis the armor thickness was 80mm and 50mm on the sides and rear of turret and chassis. The weight increased dramatically to 17 tons. With the used Maybach HL45p engine with only 140hp a maximum speed of 31km/h was achieved.
The circular access-hatches were, like on the VK1801, at the sides. A preproduction series of 30 vehicles was ordered and the first VK1601 was finished in June 1940. The production was stopped after the delivery of 22 vehicles.
The armament was a 2cm KwK L/55 and a MG42. About the dimensions and other details on the VK1601 is very less known.
The use of these is very less known. Five VK1601 were put into service with the Panzerkompanie zbV 66 in May 1942, for invasion of Malta. In August 1942 these were sent to the eastern front to serve in the 12th Panzerdivision with the "Kompanie Bethke".
Another six vehicles were attached to the 3rd platoon of 13.verstärkte Polizei Panzer Kompanie (13th reinforced police tank company).
The other VK1601 were used for driving schools and special formations.
| Der Bausatz |
Cromwell Models is known for extraordinary models in 1/35 and so you find this little rarity in their program. It is a resin complete-kit whichs costs about 80,-Euro! This is some kind of expensive and doesn't seem to be justified when looking in the box and find only a few parts. On the other hand these are in excellent quality and detail (except for the roadwheels and suspension arms).  Especially the hull, which is made in ONE piece (only the bottom plate is extra), is really great ... fine detailed engine deck, and all you need, even rough steel plates were realised partly and all without airbubbles or torsion!
The parts need some rework where the small parts should be handled with some care that they won't break.
The roadwheels have disturbing "moulding noses" which make them very ugly when cut down. All in all the wheels doesn't look best. Same for the tracks, which are made in in some longer stripes, have some fish skins and some resin flow where it shouldn't be, especially in the contact fittings where the track-stripes should get together. And that means loads of rework!!
The instruction and the fact that the kit has no decals are the worst of that kit. The instruction shows the kit construction in 5 steps, where the steps are illustrated in handmade drawings. The quality is sub-standard and features incorrect or unexact parts location, missing comments (especially for construction of roadwheels and suspension) and less detail of the drawings.
| Der construction |
 Because of the relative complete hull the construction begins easy with the fitting in of the hull bottom plate, where you have to fill the gaps and sand it a bit. The hull itself need only the final drives attached and the doors with hinges. I glued the doors although it seems that they're thoght to be movable but the system seems to me a bit unreliable.
The next step leads to the sad part of this kit which made me grey hair and looking to the instruction and complementary to the parts of the kit led often to a question mark over my head! What is mentioned and important is that you need to let a gap of 0.5-1mm from hull bottom to the ground when attaching the suspension arms! Nowhere is said that these arms have two different lengths, which you will notice when you put them directly side by side. The instruction doesn't say anything about it exept for ONE arm directed with five arrows into the 5 holes of one side, additional an "A" and "B" at the 1st and 3rd hole on one side, and "C" and "D" on the other side, where nowhere is said what that means! My Tip: there are 6 suspension arms that are a bit longer than the other 4. These 6 arms need to be placed in the 1st, 3rd and 5th hole on each side, the other arms in the 2nd and 4th. The holed need to be drilled a bit deeper to fit the arms better. The placement of the idler wheel is absolutely wrong in the i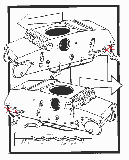 nstruction ... which should'nt be placed at the end of the hull but in the hole of the mechanic for stretching the tracks which is nearer to the road wheels. Better you consult original pictures before glueing. The roadwheels are a subject itself ... it is hard to get them really circular and the glueing together is even more hard, where you need to cut, sand and drill the fitting parts until the two halves of a wheel really gets together that you can speak of a real wheel and they all look nearly the same. The sprocket wheel is made in one piece which avoids troublesome alignment of the dents and the correct width for the track.
At this point you should paint the whole body, turret and track mudguards in sandyellow.
Next chapter of horror is the glueing of the roadwheels to the suspension arms. If you were lucky and placed the correct arms to the correct place you don't need to sand  arms down or lengthen others. But all in all the distances, holes of the wheels, etc. are such bad that they hardly fit and can hardly be glued together that they hold in place, just because they don't fit very good to the arms, touch each other, get stuck and so hard to align! The "highlight" of all this are the tracks which should be glued together from 6 longer pieces for each side. I had hours of rework to make them look like tracks and clean up the pins where the pieces get together. Nevertheless the piece of track was in the end bent and curved ... and this I had to beat around the running gear, while it is even harder to bend a resin track without breaking it! I was going to use the Friulmodel track for the VK1801 which is in real identical to the VK1601 track, but here it didn't fit around the drive sprocket! So I had to use the resin tracks what wasn't easy at all, just because width and distance of the dents of the dirive sprocket didn't match the tracks dimensions exactely which is very curious in my opinion. Nevertheless I heatened the track
  at the points of idler wheel and drive sprocket over a candle flame and needed some brutal force to get the track within the dents of the drive sprocket! After that I recognised that there was a gap betwen the track ends and no more track links to see!! So I mailed some times to Cromwell where I was tld that there must be missing a bag with some single track links to close the gap. So they apologized and promised to send me what I need, which arrived some weeks later with loads of single track links.
After all this horror the model was nevertheless looking quite good, when looking at all the circumstances. To sag the upper part of the track I heatened it again and glued it to the upper side of the road wheels with cyanoacrylat.
 The track mudguards fit very good to the hull and some of the tools that are already moulded on the mudguards have nice detail. Other tools and boxes need to be glued to it by yourself. The lights seem to have a litlle too short legs and you need to look threetimes to the instruction to find out where the Notek light should be placed.
Next step is the turret. This is of good quality, no torsion or airbubbles ... but the interior is not usable as the walls are nearly centimeter thick, but looking from outside this doesn't matter! The barrel of the 2cm KwK is too long and I cut it by some millimeter. You should look at an original picture to get an idea how fr it goes to the front (nearly to the hull front).  The hatch of the commanders cupola should be handled with much care when cutting it from the "runner", not to cut the hinges which are very fine. The figure which is in the kit looks wonderful and nice detailed but didn't fit into the commanders cupola opening!
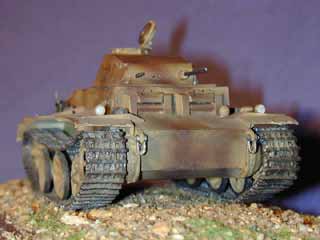
The last thing ist the hull rear which looks really good, but the instruction doesn't help very much with the confusing drawings, while you are looking which part belongs where!? Especially the postioning of the covering shield of the muffler can only be guessed. The construction finishes with postioning the other tools and spare track links.
| painting/weathering |
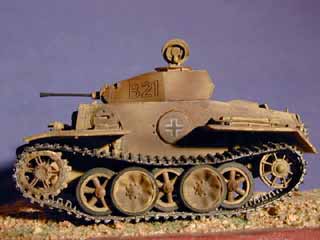
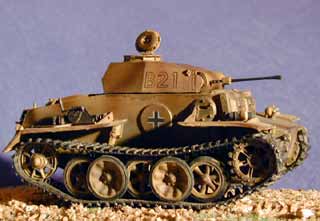
 This vehicle should belong to the 1st company of Panzer Abteilung (z.b.V.)66 of captain Bethke in autumn 1942. The vehicles were painted sandyellow for the invasion of Malta and got some additional brown splodges. I painted my vehicle with Revell color number 88 (ochre) which I modified a bit with some other colors. The brown splodges were made with an airbrush and Tamiya color.
 If the vehicles of this unit had tactical or divisional markings is not known since there are less photographic evidences of such vehicles. Therefore I only mde iron crosses to the side access hatches and a turret number beginning with a "B" and a two digit number.
The crosses as well as the number were made with Eduard Expressmasks and airbrush and I think the result is very good even I know I have to practice more! Then the edges were drybrushed with some sark metallic color.
 After that the whole vehicle was sealed with Revell clear dull paint and then I made a washing with a mixture of spirit and dark pastel chalk dust. The tracks were lso wahsed with that and were drybrushed after that with Revell paint number 91. The works were finished with a bit dust from lightbrown/yellowish pastel chalks, applied to the area of the running gear.
| conclusion |
Again a kit where good and bad are so close. With a price of more than 75,-Euro it is very expensive, but gives you some very good and detailed parts like hull, turret and track mudguards which all fit very good together. On the other hand there is the very simple made, unexact and partly wrong instruction, the running gear with not good fitting wheels and horrible track ... and that are things that CAN be made much better. Even the missing decals is a negative point in my opinion.
That leads to the conclusion that the kit can be made into an eye catcher when you are willing to rework and clean up and have enough handycraft, even when the price will put most people off!
| price / value: | ***** | parts fitting: | ***** |
| details: | ***** | skill level: | ***** |
 |
 |
 |
 |
recommended literature:


Beyond this the "Deutsche Soldaten Jahrbuch 1985" is very useful as it has pictures and report of the Panzerkompanie zbV66, which had VK1601.
In the future an issue of the Panzertracts from Tom Jentz is announced about the Panzer II series, as well as a book from Joachim Baschin, which I would recommend.
© 12/2001 Thomas Hartwig
